It's been more than one & a half years since React Router launched its first release of version 6 back in January 2020 which is currently still in the alpha phase. Now it's more developed, brings some awesome features & can be used in production-level apps.
Why React Router?
Single Page Applications have good features but it comes with some trade-offs, it diminishes the default behavior of browsers. As the whole site is brought into one page then there's no traversing between pages using forward-backward, there is no history of various pages users visited on site, the same URL throughout the site so no bookmarks. So to overcome these trade-offs & give users a native browser-like feel, we should use routing in React applications. React Router provides the routing in our application & adds these features of the browser in React's single page applications.
Why React Router v6 over v5?
React Router v6 comes up with some good new features as well as improvements over existing features. Some of the major changes in v6 are:
- Routes instead of Switch
- Nested Routes
- Relative Route path & Link to
- useNavigate instead of useHistory
- Reduced bundler size
- NavLink no longer supports activeClassName
Routes instead of Switch
In v6 Switch has been replaced with Routes which brought some awesome improvements in it. Now we don't have to write exact for "/" route as it matches exacts itself.
In v5:
<BrowserRouter>
      <Switch>
        <Route exact path="/"><Home /></Route>
        <Route path="/profile"><Profile /></Route>
      </Switch>
    </BrowserRouter>
In v6:
<BrowserRouter>
      <Routes>
        <Route path="/" element={<Home />} />
        <Route path="/profile" element={<Profile />} />
      </Routes>
</BrowserRouter>
Nested Routes
Now in v6, nested routing is simpler. It used to be very extremely defined which requires string matching. In v6, now we can nest components declaratively.
In v5:
<Routes>
        <Route path="/" element={<Home />} />
        <Route path="customer/*" element={<User />} />
</Routes>

//then in User component
<Routes>
        <Route path=":id" element={<UserProfile />} />
        <Route path="/me" element={<OwnUserProfile />} />
</Routes>
In v6:
<Routes>
    <Route path="/" element={<Home />} />
       <Route path="users" element={<Users />}>
          <Route path="/" element={<UsersIndex />} />
          <Route path=":id" element={<UserProfile />} />
          <Route path="me" element={<OwnUserProfile />} />
    </Route>
</Routes>
Relative Route path & Link to
Route and Link which are under the Routes element are automatically relative to the parent route that rendered them. This makes it a lot easier to think about your React Router app as lots of small apps that are just stitched together at different mount points
useNavigate instead of useHistory
Sometimes you’ll want to programmatically navigate. For example, after clicking on logout you want user to navigate to the login page. This is the useHistory library in v5, which has been renamed to useNavigate in v6:
In v5:
const logoutHandler = () => {
    // logout code
    const history = useHistory();
    history.push("/login");
}
In v6:
const logoutHandler = () => {
    // logout code
    const navigate = useNavigate();
    navigate("/login")
}
Reduced bundler size
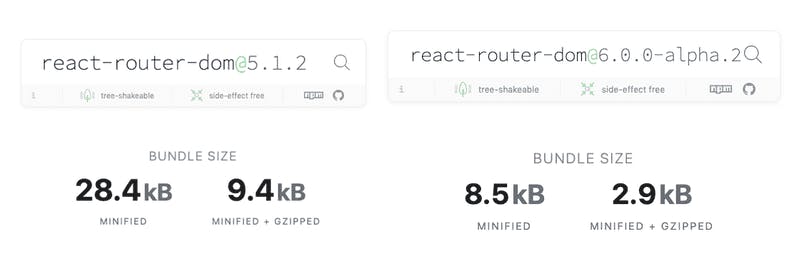
V6 did a major improvement in reducing bundler size. In v5 it was about 28kb which is now just around 8kb.

You should also keep in mind that this is just a high-level comparison. React Router contains many modules and hooks that you may not even need in your application, so depending on which pieces you import the numbers will vary.
NavLink no longer supports activeClassName
This is a breaking change that is released in 6.0.0-beta.3 (around 10 days ago) that can distort the UI of your site if not handled properly. NavLink no longer supports the activeClassName or activeStyle props. Instead, they provide a more powerful API that allows you to pass functions to either the className or style props to conditionally apply values based on the link's active state. While a bit more verbose in some cases, this offers a nicer experience for folks who use utility class-based CSS
In v5:
<NavLink className="link" activeClassName="active-link" />
<NavLink style={{ color: "blue" }} activeStyle={{ color: "green" }} />
In v6:
<NavLink
  className={({ isActive }) =>
    `link ${
      isActive
        ? "active-link"
        : // Couldn't do this before!
          "inactive-link"
    }`
  }
/>
Conclusion
I'm pretty excited about the stable release of React Route v6, already started using v6 in my projects & loving the way it provides simplicity compared to v5.
